


35mm negative:
A 35mm negative is the negative of a 35mm camera, so a camera that uses a 35mm film. The negative is 24 x 26 mm and is often used as a reference to determine whether a digital camera can be called a full-frame camera or whether there is a smaller sensor that causes a crop factor for the lenses used. This crop factor is then also calculated with respect to a 35mm negative.
Aberration:
Aberration is the collective term for image or lens errors in an optical instrument. The word is derived from the Latin "ab" (off-, away-) and "errare" (to wander). Many lens errors decrease when the aperture is closed. With an otherwise perfect lens, however, the resolution is limited by diffraction, which in turn is also dependent on the aperture. As a result, many lenses have optimal image sharpness when the aperture is about two stops smaller than the maximum aperture.
There are many forms of these image or lens errors:
-
chromatic aberration: an optical error of lenses and lens systems that arises because light of different wavelengths is not refracted to the same degree at the lens surfaces. The cause of this is dispersion (color separation), a material property of glass and other optical media. (see also apochromatic correction)
-
non-chromatic aberration:
- spherical aberration: the imaging error of a lens, a mirror or a lens system caused by the fact that, in a pure spherical shape, parallel light rays entering at different distances from the optical axis do not coincide in the same focal point.
- astigmatism: an optical abnormality (aberration), an optical system has different focal lengths for rays traveling in mutually perpendicular planes. In the image of, for example, a cross (+), the horizontal line is then sharp at a different distance from the vertical. Both lenses and mirrors can show astigmatism.
- coma: an image error caused by asymmetry in an optical system. Coma (from the Latin coma: hair) can occur with lenses and lens systems as well as with mirror optics. Because of coma, pixels outside the optical axis are not depicted in a point-shaped manner but in a more comet-shaped manner, the more strongly they are the further away from the optical axis.
- vignetting: (or vignetting) is the decrease in brightness in the corners of an image or photo, relative to the center.
- field curvature: with lenses, objectives or mirror systems, one speaks of field curvature if they form an image of a flat object that is not flat, but curved.
- distortion: an image is when a lens system does not depict straight lines from reality as straight lines. Sometimes, such as with a Fisheye lens or digital manipulation, distortion is intentionally present with internal reflections
- color casts
Achromat:
An achromat is a lens system consisting of two lenses bonded together, which merge two colors from the spectrum in the same focal point. In general, it concerns blue and green. The achromat corrects chromatic aberration.
Actinism:
By actinity we mean the degree to which substances change when they are exposed to light. Consider, for example, photographic emulsion in analog photography.
Anamorphotic Lens:
An anamorphotic lens is a lens that can compress an image in width or height. The image is of course highly distorted, but can again be projected in the correct proportions by using a similar anamorphotic lens for projection.
Aperture:
A screen with an adjustable opening between the lens and the shutter, through which the light falls on the CCD sensor. The larger this opening, the more light that falls on the CCD per unit of time. The size of the opening is measured in F numbers (called F stops) such as F1.4, F4, F5.6. The larger the F number, the smaller the aperture. Each consecutive F-stop on a camera transmits half as much light. So F4 lets in half more light than F5.6.
Rule of thumb for the aperture is:
- The larger the F number, the smaller the aperture (opening).
- The smaller the aperture, the less light that hits the sensor.
- The less there is on the sensor, the sharper the overall image around your focus.
The reverse applies:
- The smaller the F number, the wider the aperture.
- The wider the aperture, the more light that hits the sensor.
- The more light that falls on the sensor, the more blurred the overall image around your focus.
Apochromatic correction:
A technique in which an objective is corrected for the three primary colors and is therefore completely free of chromatic aberrations (dispersion errors).
APS:
Advanced Photo System (APS) is a film format for photography. The film is 24 millimeters high (normal 35mm photography is 35mm) and has three image sizes:
H for "HDTV" (30.2 x 16.7 mm; aspect ratio 16: 9; 4x7 "print)
C for "Classic" (25.1 x 16.7 mm; aspect ratio 3: 2; 4x6 "print)
P for "Panorama" (30.2 x 9.5 mm; aspect ratio 3: 1; 4x12 "print)
ASA:
The film sensitivity of a film roll, film or digital camera is expressed as a number, for which a number of standards can be used. The ISO / ASA (International Organization for Standardization / American Standard Association) and DIN (Deutsches Institut für Normung) sensitivity standards are based on the amount of light required to produce the weakest impression of light on the photographic film. Their definition is based on an average grade of normal development. The standard is known as ISO 5800: 1987. See also ISO.
Aspherical optics:
In optics, aspherical optics is understood to mean a lens, a mirror or a combination thereof where at least one mirror or lens surface is not spherical (spherical) - nor flat - but has a different shape, for example paraboloid, hyperboloid, ellipsoid or otherwise. Aspheric literally means non-spherical.
We speak of an aspherical surface with a lens that does not have a perfect spherical shape. An aspherical lens is used to prevent lens errors. Modern lenses often include multiple aspherical lenses.
Aspect ratio:
The aspect ratio is the ratio between the longest side and the shortest side of an image (photo). In the 5×4, 3x2 (for example 35mm), 4x3 (the so-called Micro four thirds format) and 16x9 format come over from the widescreen television. You will find more information about the problems that the aspect ratio can cause when printing or printing in the article below:
Aspect ratio and printing:
Anyone who has ever worked in a photo shop where one could also hand in photos for printing knows the phenomenon of the customer complaining about Uncle Piet who was just in the photo at the time of shooting and has now disappeared from the photo while less pleasant people just get up. Obviously, this is the fault of the person who printed the photos and because they are not present, the wait staff in the photo shop is screwed. Because Uncle Piet is definitely on the negative. Admittedly on the side, but he insists.
However, what went wrong is simply an incorrect aspect ratio. For the explanation we will first go to the 35mm 35mm film. We are then dealing with negatives of 36 mm long and 24 mm high.
The aspect ratio is the longest side divided by the shortest side. In the case of a 35 mm image, 36/24, or 3 on 2 or 1.5. Such an image can be printed without any problem on any sheet of paper that also has that ratio. But in practice it is less problem-free.
Common paper sizes, with the aspect ratio in brackets 6 x 9 (1.5), 9 x 13 (1.44), 13 x 18 (1.38), 18 x 24 (1.33) and 24 x 30 (1 , 25). We then see that the small 6 x 9 format still fit exactly, but with each magnification the difference between the aspect ratio of the paper and that of the negative increased. The decreasing aspect ratios of the paper indicate that the magnifications actually got squarer (a square has an aspect ratio of 1)
So if Uncle Pete still fitted well with a 6x9 format, then with a bit of bad luck we did not see him again with a 30x40 format. Because a suitable sheet of paper should be 1.5 x 30 or 45 cm long. So no less than 5 cm falls off.
Now a foray into the digital world. There are various sensors with different aspect ratios in circulation. Here, use is made of printers that use the common office paper sizes. In Europe this is usually the A0 - A7 series, of which “the A-foursome” measuring 21 x 29.8 cm is best known. Due to the way in which this series is established, we see an aspect ratio that is around 1.4 in all formats. Our 35mm negative will not fit on that format either ...
But what about, for example, a modern 16x9 widescreen format? This has an aspect ratio of 16/9 or 2.11. That will fit very nicely on your widescreen monitor. But when printing you will have to deviate to a very different paper size because, for example, an A4 would have to be no less than 2.11 * 20.9 = 44 cm long to fit and is therefore more than 14 cm short.
Then not only Uncle Piet no longer fits, but his neighbor can also forget it. Fortunately, everyone nowadays prints themselves and the poor operators in the photo trade are no longer bothered with it. The problem can be reduced by printing from a roll and then cutting the paper to size, but what amateur owns a printer that works off the roll? If we really want an exact representation, then we will soon revert to a specialist laboratory with associated specialist prices for such a print.
Astro photography:
Astrophotography is photographing non-terrestrial objects, such as the sun, moon, planets, stars, comets and nebulae (celestial bodies). A normal telescope with interchangeable eyepiece is used for this purpose, whereby a connection to the camera must replace the eyepiece. With a modern digital SLR you can generally take even better pictures than with the digital compact cameras; that goes without saying. However, for the astrophotographer who wants to photograph faint objects, the digital cameras have a major disadvantage; they have a filter that blocks the infrared. They thus block an important part of the spectrum, especially for weak objects. That filter can be removed from the camera, but then the camera is no longer suitable for normal photography. However, a development is underway to adapt these cameras so that they are suitable for both this branch of astrophotography and for normal photography. This of course for an additional cost.
Backdrop:
A backdrop is a fake background that is projected behind the model in a studio. The term is also used more generally, referring to a background cloth, for example. When using a backdrop, the background is immediately visible, in contrast to the use of Chroma Key where we add the background later with a post-editing program. The advantage over Chromakey is that the model can also react directly to it and does not have to react “imaginary” to something that cannot be seen (but only needs to be added later with photo editing).
Backlight:
Large light source that illuminates the lens directly behind the subject of the photo. Normally you take the best photos when you have the sun or another light source behind you. That way the light source illuminates your subject.
With backlighting you take a photo 'against the light'. The light source is therefore in front of you, instead of behind you. This can sometimes cause photos to become overexposed, because the lens cannot handle it well, but it can also cause beautiful effects.
Bi-concave lens:
A bi-concave lens is a simple, double-hollow lens element that diverges transmitted light rays (fan formation). Also called hollow lens. The diopter value of a concave lens is preceded by a minus sign. So with the bi-concave lens, both sides are hollow. If one side of it is straight, it is called a plano-concave lens. In addition to the hollow variants, there are also convex lenses, all belonging to the simple lens types. The different simple lens types outlined:
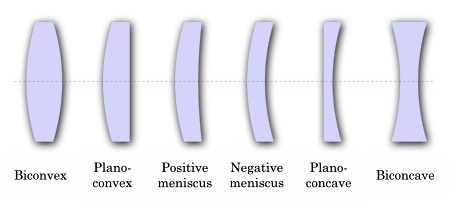
Bi-convex lens:
See bi-concave lens
Blue hour:
The blue hour, beloved by photographers, is the part of the evening twilight where it is not completely dark yet but the streetlights and the lamps in the houses are already lit. Incidentally, there is another (French: l'heure bleu) school that considers the period just before sunrise as the “blue hour”.
Blur:
Out of focus. In photography, this is often caused by incorrect focus or (too fast) movement of the camera or subject.
Bokeh:
Bokeh expresses the quality of the blur in a photo. It is about the blur that arises because the surroundings fall outside the field of focus. A correct bokeh gives a highlighted sharp subject with such a limited depth of field that the environment almost forms a blurry whole. A less good bokeh is if, in a photo, one sees blurred trees in the background, but the branches can still be seen in such a way that it still looks busy and does not form a sterile background.
The quality of the bokeh (limited depth of field) in a photo is often dependent and can be influenced by the number of aperture blades and the aperture opening (F1.4 or F2.8). The more diaphragm blades, the better in this case. And the larger the aperture value is set (F1.4), the more limited the depth of field. The word is taken from the Japanese word 'boke' which means 'unsharp'.
Bracketing:
Bracketing is an English term for taking a series of photos in which a certain setting keeps changing slightly. This often affects the exposure. For example, you can take a series of photos with 1 stop under, 1 stop overexposed and a 3rd photo with 0 stop exposed.
Bulb:
On many cameras we find the B mode, which is short for Bulb. This bulb mode is for taking pictures with a slow shutter speed. The shutter opens when the shutter button is pressed and closes when it is released. The bulb mode is therefore often used for evening and night shots.
Camera obscura:
The camera obscura or dark room was the namesake and predecessor of the current photo camera in which a dark space was projected through a small hole in one of the walls. It seems that the phenomenon was already known in Aristotle's time, although of course there was no application for it then. The technique still has a large number of enthusiasts in the form of pinhole photography.
Camera Toss:
The camera toss technique is a form of photography for people who like to experiment a lot and have little pity for their camera. The camera toss principle means that you put the camera on the self-timer (or use a wireless remote control) and then throw it away as far as possible or throw it away. The result is of course totally unpredictable in terms of photo, the camera probably won't survive after a number of “camera tossing”. The necessary images can be found on google.
CCD sensor:
Charged-Coupled Device: a chip that is made up of light-sensitive receptors. There is a color filter on the CCD chip, so that each receptor only registers one of three primary colors, red, green and blue. The information captured by the CCD chip is converted by the software in the camera into a digital image file consisting of pixels. Here, the primary color that a receptor has captured becomes the complement to the base of both other primary colors that were captured by the surrounding receptors - a process known primarily as demosaicing, but also as Color Filter Array (CFA) interpolation (CFA). interpolation) and color reconstruction (color reconstruction).
Close up:
The subject is usually photographed up close (by zooming in or standing close). Other variants are: midshot where the subject is partially (usually halfway, the bust) or total shot where a subject or person is photographed in its entirety.
Color cast:
The term color cast is often used in place of cast. It means that a certain color is unintentionally or even annoyingly present in a photo. There are many known causes for color cast, such as light (orange color cast at sunset), film development errors, wrong settings in post-processing or a wrong white balance. With the modern post-processing software, color cast is usually good and easy to fix.
Complementary colours:
We speak of complementary colors for colors that are directly opposite each other on the so-called color circle. Yellow and violet, red and green as well as blue and orange are complementary colors. The properties of complementary colors are important in building a color composition. A big advantage of complementary colors is that they are in perfect harmony with each other. These colors also tend to reinforce each other when they are used towards each other. Painters are familiar with the fact that complementary colors destroy each other, as it were. Mixing always produces a form of black or a color very close to it.
Converging lens:
A converging lens is thicker in the center than at the edges. It is a convex lens. A converging lens allows the light beams to converge in one point (focal point), in contrast to the diverging or concave lens that scatters the light beams in a fan shape.
Crop (cropping):
Omit part of the original photo, or enlarge the photo so that parts are out of frame to improve the composition. By cropping we mean cropping a photo during post-processing so that a smaller part is actually used. Cropping itself is sometimes under discussion because many photographers believe that you take the picture with the camera and not afterwards on the computer. However, cropping (cropping) is necessary if you want to print in a different format than the photo was taken (see also Aspect Ratio)
Depth of Field (DOF):
Depth of field is the distance between the closest subject and the most distant subject and what range between them is sharp.
For aperture we had stated: the larger the F number, the smaller the aperture, the less light that falls on the sensor, the sharper the total image around your focus. So the smaller the F number, the larger the aperture, the more light that falls on the sensor, the more blurred the overall image around your focus.
Practical example: a photo taken of a table with, among other things, a glass of water on which you put the focus. The photo taken of the entire table with an aperture of F1.4 ensures that the glass of water is sharp, but the rest of the subjects on that table and possibly the table itself already appears quite blurry and blurry. The same photo taken with an aperture of F11 results in sharpness across the board. Please note that this requires a lot more light or a flash support, otherwise the photo will be underexposed or the shutter speed will be too slow for handheld photography.
DRI:
Dynamic Range Increase is broadly the same technique as HDR, which therefore provides a greater dynamic range of your photo. So first read what HDR is.
With that knowledge, however, there is 1 difference between DRI and HDR. A DRI is also distilled from multiple photos with multiple exposures, only the photographer has only shot 1 photo in RAW format as the original. So what you do is draw different exposures from 1 RAW photo. The rest of the procedure is the same as for the HDRI technique.
Dispersion:
Dispersion is another term in the photography world for chromatic aberration, an optical error of lenses and lens systems that results from light of different wavelengths not being refracted to the same degree at the lens surfaces. We call the cause of this dispersion (color separation).
Distortion:
Distortion is the amount of distortion of a lens caused by the fact that there is no lens without lens errors. Distortion is the official name for bias. Known forms of distortion are the pincushion distortion and the barrel distortion.
En-Face / En-Profile:
En-profile: portrait photo in which the face is photographed from the side. The other variant of a portrait photo is where the face is photographed from the front: en-face.
EXIF:
The Exchangable Image Format is a JPEG variant that stores other data in addition to the image itself, such as the camera type, date of recording, aperture, shutter speed and zoom factor. Image editing software usually includes a function to display the EXIF information.
Exposure:
With both a classic film camera and a digital device, the image is created by the exposure of the chemical film or the CCD sensor in the camera. The amount of light is determined by the combination of aperture and shutter speed.
The more light reaches the film or CCD, the brighter the image. If there is too little light on the film or CCD, the result is an underexposed image. In most cameras, the exposure is controlled automatically: the camera calculates the correct combination of aperture and shutter speed based on the available ambient light.
Exposure compensation:
A setting that increases or decreases the automatically calculated exposure. It is expressed in EV (exposure value), where EV 0.0 is the automatic exposure, a setting that increases or decreases the automatically calculated exposure. It is expressed in EV (exposure value), where EV 0.0 is the automatic exposure.
Extension ring:
As with the bellows device, an extension ring is intended for very close photography and especially macro photography. The extension ring is available in different thicknesses and is mounted between the camera and the lens. They are also sometimes offered as a set of three pieces with which different lengths can be created. Setting closer is then possible, but focusing at a greater distance and especially at infinity will no longer work. The extension ring exists in a passive version in which all communication between lens and camera is disabled and an active version in which all functionality is retained.
F-stop:
The so-called F-stop is the series of numbers to which the aperture is set. In the literature we then come to the mention of an aperture value such as F / 3.5 or F / 11. Each lens has a largest opening, for example F / 1.4 and a smallest opening, for example F / 32. It is sometimes confusing that a smaller F-number has a larger opening. Instead of the notation “F /” we also encounter “1:”. The notation then becomes, for example, 1: 2.8. This does not matter for the interpretation.
Fill flash:
Fill flash is used to reduce the contrast of a photo. For example, a person against a light sky will appear very dark or even as a silhouette due to the backlight. To prevent this, a flash is used to illuminate the dark area (or object in the backlight) by means of a so-called fill-in flash. There are even special dual flash units with extra options for fill-in flash when using the flash itself.
Fisheye lens:
A fisheye or fisheye lens literally photographs everything in front of this lens with an angle of view of no less than 180 degrees. A fisheye produces a round image on film or sensor, on which everything is of course significantly distorted. In particular, round objects that are close by are extremely pulled out of their shape. All lines are also curved around the center of the lens. Most fisheye lenses have a focal length of less than 16mm. Values between 8 and 16mm are common for 35mm or full frame format. Due to the wide field of view, details are often unintentionally photographed, such as shoes, a cap on a cap or the leg of a tripod. A fisheye is used relatively little. For most applications, the effect is just a bit too strong and these lenses are also often hefty on the price.
Flare:
A flare is a (vague) strip of light that is caused by an internal reflection on a lens part or lens element. A flare manifests itself in two ways; a visible object and like a haze over the image. This haze / haze gives the image a "washed" appearance by reducing the contrast and color saturation.
Floodlight:
A floodlight is a photo lamp for general lighting that provides a large amount of light over a large area. A floodlight has a wide reflector around the lamp that diffuses the light. A floodlight therefore gives soft, somewhat blurred edges to shadows.
Focal point:
The focal length is the most important characteristic of a camera lens when it comes to application possibilities. With a pure lens, all parallel beams of light converge in the same point behind the lens, the so-called focal point. With a camera lens, this is only the case when the camera is focused on infinity. This point is the focal point, often referred to as "F" in the literature.
In the past, focal length was an indication of the type of lens we used. For example, a 35m was a light wide-angle lens. But if we now put that 35mm on a digital camera with a crop factor of 1.6, we see that this corresponds to a lens for film of 1.6 * 35mm = 56mm, which is roughly the usual value for a normal or standard lens. standard lens for a medium format camera (6×6 or 6×7) is 80mm, for example
Focal length:
This is the distance in millimeters between the CCD sensor of a digital camera (or the film of an analog camera) and the center of the lens. A short focal length provides a wide angle image (also called wide angle); a long focal length creates a telephoto effect. With digital cameras, the focal length is also usually expressed as the equivalent of a 35mm film camera. Focal length is often referred to as "f" in the literature.
FPS:
The abbreviation FPS, which stands for Frames Per Second, indicates the capacity of a digital camera to take pictures and store them in a buffer.
Frosted glass:
The focusing screen is the part of the SLR camera on which the image is projected and which is focused on. The focusing screen may include focusing aids such as microprisms, an adjustment wedge, and sometimes the focusing screen may have lines to help achieve a particular composition. With the better cameras it is usually possible to exchange the focusing screen for another. The necessary specialized manufacturers can be found online.
Golden ratio:
With the original golden ratio, the image is horizontally divided into a part of 68% of the image and a part of 32% of the image. The golden ratio is perhaps one of the best-known composition techniques that can be found in many historic buildings, for example.
Gray card:
A gray card is a light gray sheet of cardboard that is also photographed once and that serves as a reference to be able to restore the “real” colors later in the event of a deviation of the light. The exposure can also be adjusted with this afterwards. A standard gray card reflects 18% of the light. We therefore also speak of an 18% gray card.
Grazing light:
Light falling sideways (almost parallel) on the subject in the picture. It 'brushes' along the subject, as it were, accentuating all imperfections. The special elements of the subject of the photo come out even more beautifully.
Haze filter:
The haze filter is a near-colorless filter designed to reduce the haze that hangs in the distance in landscape photos. As with the UV filter, the haze filter is also sometimes used to protect a lens, whereby of course the same drawbacks of possible disturbing effects apply.
HDR:
High Dynamic Range (also called: High Dynamic Range Imaging (HDRI)) is a technique that provides a greater dynamic range of light intensities between dark and light areas within a photographic scene compared to normal digital photo techniques.
In other words if you take 1 photo of a scene, a (back) light source often causes the wrong light measurement or white balance, so that the light parts often become blown out spots in the photo. These white spots also no longer contain any information and can therefore no longer be retrieved with photo editing software. To prevent this, you can of course underexpose your camera in such a situation, but it remains to choose between 2 evils, because that ensures that no further drawing can be found in the shadows and dark areas. Taking several photos, each with a different exposure (at least 3), offers a solution. You then unite these photos by means of the HDR technique and, as it were, use the shadows of the overexposed photo (s) for a correct drawing through and the highlights of the correctly underexposed photos to prevent blown spots in the photo. The 'normally' exposed photo is used as a starting point.
As already mentioned, it is therefore a must to take at least 3 photos with different stops of exposure. This option is usually available on cameras with the bracketing function. Bracketing recording with 2 stops of exposure difference means that photo 1: -2 stops is taken, photo 2: at 0 stops, and photo 3: at +2 stops. (-2.0.2). Programs such as Photomatix from HDRsoft or HDR Efex Pro from Nik Software can merge the photos with different exposures into an HDR photo.
High key:
High key is a form of photography in which white plays the leading role and the subject is displayed as much as possible in delicate lines and often in light shades of gray, where there may be some accents in a different color. High key photography usually aims to express fine, delicate, delicate moods. A very strong overexposure already gives a high key effect. High key is the opposite of Low key.
ISO value:
The light sensitivity of a non-digital old-fashioned chemical film is expressed in ISO values (50, 100, 200 or 400) (ISO: International Organization for Standardization). The more sensitive the film, the less light is needed to take a good picture. The light sensitivity in digital photography is incorporated in the electronics. The CCD chip in an ordinary digital camera has a light sensitivity equivalent to ISO 100. See also ASA - American Standard Association.
Some digital cameras allow you to set a higher ISO value; the signal received by the receptors on the CCD chip is then electronically amplified. However, this also increases the signal / noise ratio, which can lead to annoying errors in the recording.
JPG / Jpeg:
The abbreviation stands for Joint Photographic Experts Group, the organization that developed this digital file format. JPEG compresses digital images to take up less space, but unlike TIFF compression, it loses information. Every time you open and edit a JPEG image, it is recompressed. If you want to edit an image intensively, save it as TIFF or in RAW format. When the editing is finished, you can still save the final file as a JPEG.
Lomography:
Lomography is a fairly new phenomenon in photography. The name comes from a simple camera, the Lomo Compact Automatic (LC-A), which was made in St. Petersburg, Russia. This camera was taken out of production in 2005. However, many (also simple digital) cameras have been specially made that take four pictures in quick succession for this lomography movement within photography. It is also used old cameras that show some defects. It is usually difficult to predict what will actually be recorded on the recording, but that is precisely one of the charms of lomography. The photo-technical recordings are of a shockingly poor quality, but the phenomenon of lomography has a large group of enthusiasts. Lomography has a casual, casual way of photographing: without looking, from the hip and without thinking. It doesn't matter whether the picture is sharp or jittered. Someone who does Lomography is called a Lomographer.
The Ten Golden Rules of Lomography:
- Take your camera with you everywhere;
- Always use it, day and night;
- Lomography is part of your life;
- Practice freehand recordings;
- Get as close to the subject as possible;
- Don't think;
- Be quick;
- You do not need to know in advance what will be in the photo;
- Not afterwards either;
- Do not worry about these rules.
Low key:
Low key is a form of photography in which black is paramount and the subject is often displayed in dark shades of gray and a lot of black. Usually the image is largely formed by a few light accents. Low key is the opposite of High key. With a strongly underexposed photo, one often already obtains the low key effect.
Macro photography:
The macro mode on a camera allows you to take close-up pictures, sometimes at a distance of two cm from the lens. Digital macro photography is about photographing objects and people from a short to very short distance. The object is zoomed in on just in front of the lens, making the background a bit more blurred. There are also special macro lenses available that are designed dedicated for that purpose, or macro attachment lenses to give a regular lens that option. With digital SLR cameras, a subject can be magnified even more with a lens by using so-called extension rings, which then shift the focal point of the lens.
Most macro objects achieve an image standard of 1 to 1, but there are also versions on the market that go up to 2 to 1 and thus already give an enlargement of the subject on the sensor or a negative. We find macro lenses mainly in the focal lengths of 50 to 135 mm, because at shorter focal lengths you have to crawl too close to the subject and at longer distances it is impossible or hardly to focus.
Micro photography:
The next step in magnification after macro photography is micro photography. Then we talk about an image scale of 20 or more. Micro photography can only be done with special tools such as a microscope. Usually the eyepiece of the microscope is replaced by a connecting piece directly on the camera.
Negative meniscus lens:
See bi-concave lens
Objectively:
Often a lens is called a lens, but this is wrong. After all, a lens is a set of a number of lens elements with a certain photographic property. We know lenses in all kinds with a specific purpose. The standard lens is a normal lens with a focal length of approximately 50mm for an analog or digital full-frame 35mm camera and 35mm for a digital camera. The field of view of such lenses is comparable to that of the human eye. All lower values with a larger field of view give a wide-angle effect, all higher values with a smaller field of view give a telephoto effect. A lens can be a fixed part of a camera, but can also be interchangeable, which we find especially with SLR cameras, so that they can be exchanged. In addition, there are objects that accommodate both wide-angle and telephoto in one lens (eg 18-250 mm).
Out of bounds:
An 'out of bounds' (OOB) is an editing of a photo in which, with the aid of a frame, possibly supported by shadows, part of the photo or subject of a photo falls outside the frame while the remainder remains neatly within the frame, creating a spatial effect and / or 3D effect is created.
Outside range:
We speak of colors that are out of gamut if they are no longer within the range that a particular device can produce. For example, colors with a slight nuance look exactly the same.
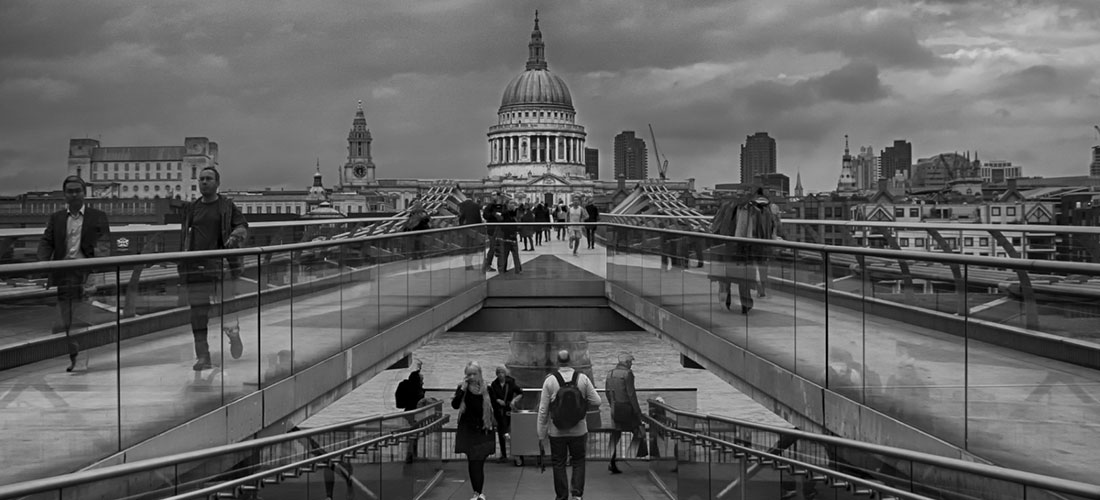
Perspective:
The perspective is the point of view from which a subject is viewed. With a photo in frog perspective (frog position) the photo is taken from below. The subject of the photo is higher than the creator of the photo. (Like a frog looking up at a human). With a bird's eye view (bird's eye view) photo is taken from above. The subject of the photo is lower than the creator of the photo. (Like looking down on a human).
With a line perspective it is possible to show depth in images. This can also be recognized in photos. The oblique lines always disappear to a common 'vanishing point' that lies on a horizontal line on the horizon.
Vertical lines are generally kept upright. Vertical lines in the front of the photo appear larger than vertical lines in the background (in reality, for example, they can be the same height, but due to the perspective effect it seems as if what is in the foreground is larger than what is in the background of the photo).
Pinhole photography:
Pinhole photography is taking pictures with a camera without a lens. The principle is simple: a small hole is made on one side of a light-tight box and a light-sensitive material (film or photo paper) is placed on the other side. The light will do the rest.
Why pinhole? There is no simple answer to this: pinhole is photography in its most elementary form. Here you are not bound by the possibilities that camera manufacturers offer in increasingly beautiful cameras. On the contrary, you are stimulated to fully use your creativity in complete freedom. You are going to see reality differently. Pinhole photography is taking pictures with your awareness. Anyone who comes into contact with pinhole photography for the first time often poses the question: "Why are you concerned with blurry photos?" However, those who take the first steps quickly get in touch with the pinhole and experience much more fun shooting. Pinhole photography is fun to do because of its simplicity (no lens with lens aberrations) and the infinite depth of field.
Pixel:
Pixels (picture element) are the building blocks of digital images. Each pixel has a specific color, which is determined by the amount of green, red and blue (RGB) in the pixel. A photo, but also a video or the image from TV consists of a lot of these pixels. The smaller the picture, the more it fits within a square centimeter, the sharper the image. With the HD (High Defenitions) technique, the pixels have been reduced in such a way that more pixels made up of image lines and image columns fit on the same screen or medium.
Plano-concave lens:
See bi-concave lens
Plano-convex lens:
See bi-concave lens
Positive meniscus lens:
See bi-concave lens
Pose:
Certain posture of a model that is assumed before taking a photo.
Prime lens:
A prime is a lens with a fixed focal length. A zoom lens can of course replace a number of primes, but there are still plenty of photographers who are very attached to their prime lenses. They certainly have advantages too. For example, the brightness of a prime is generally greater and the sharpness is often a fraction to sometimes much better. The disadvantage, however, is that you have to take a lot with you and that the costs of a number of prime lenses can increase considerably compared to a single zoom.
RAW:
The RAW image format contains the information as captured by the CCD sensor, without being processed by the camera software into a TIFF or JPEG file. You need to import RAW files to a PC and do the further editing there. The advantage of RAW photos is that RAW is a pure "digital negative", and is not affected by the processing algorithms (such as sharpening, compression, etc.) in the camera.
Refractive index:
Refractive index is the degree to which light is deflected by a lens. This refraction takes place at the separation of glass and air and thus occurs twice with each lens. The index is used to calculate the angle of refraction. Not only glass has a refractive index, but also water, for example. This ensures that when we put a stick in the water that it appears to have a kink on the surface of the water.
Repoussoir:
An image in the foreground that ensures that the background has to give way more. Provides depth effect in photos. A clean example is photographing a landscape through an opening of trees in the foreground.
Resolution:
With digital cameras we have to distinguish two types of resolution. There is the hardware resolution of the CCD sensor, which indicates how many hundreds of thousands or millions of sensors the CCD contains. The more sensors, the sharper the image the CCD can capture.
And there is an image resolution. The light that the CCD registers is then converted into a digital image composed of pixels, for example 1,600 x 1,200 pixels or 640 x 480 pixels. Because not all information from the CCD can be translated, the maximum resolution of the digital photos is by definition about ten percent lower than the hardware resolution of the CCD.
Photos, videos and pixels now also belong together. For the resolution of a photo print or video (image) the rule applies: the higher the resolution of the photo or video image, the sharper the photo print or video image.
Sepia:
The sepia color used to be used instead of black and white. Sepia or sepia tone refers to the colors of black and white photos that have been treated using a sepia process. In this process, the black colored silver particles are converted into compounds with a brownish color called sepia. It is still used (through post-processing software) to give a photo an “old” effect. There is not one color known as sepia, the term encompasses a range of yellow and brown mixes.
Shutter speed:
The shutter is a small screen between the lens and the CCD sensor of the camera that opens a certain time factor to let light through. How fast this opens and closes is called the shutter speed of a digital camera or the time factor.
Shutter speed is expressed in fractions of a second, for example 1/25 for a shutter speed of one twenty-fifth of a second. For action shots, you need shutter speeds of 1/200 or faster; for night shots of the starry sky shutter speeds of several seconds to even minutes are required (see bulb).
SLR:
SLR is a built-in system in a camera, where you look through the viewfinder through mirrors in the camera that reflect what falls on the lens, which is what is actually seen through the lens. Digital SLR then indicates the way in which the photos are stored. No longer analog on a physical film or film, but digitally on a digital medium such as a memory stick, flash card or similar flash memory media.
Stereo photography:
In stereo photography, instead of one, two images are created that give a depth effect by viewing simultaneously. The principle of stereo photography comes from aerial photography where it was used for military purposes. The images are viewed with special glasses that use either 2 primary colors or polarization. These glasses reassemble the image for the eye. There were also special slide viewers with which two slides could be viewed simultaneously.
Given the advance of three-dimensional feature films, in which Avatar has set the trend, and the possibility of three-dimensional flat screens, we can expect to see many more developments in the field of stereo photography in the coming years.
Stitching:
The technique of stitching is to attach digital photos together by connecting important points in the image, creating a larger, widescreen image. Stitching is popular for creating panoramic photos.
Stop down:
We speak of stopping down when we choose a higher diaphragm value, so for a smaller light opening. So less light comes through the lens when stopping down. The advantages of stopping down are usually that the quality of the lens can increase slightly and that the depth of field increases. People who like to have a blurred background try to avoid stopping down as much as possible (see also Bokeh).
Strobist:
Normally we speak of the flash where the flash is placed on the camera. This flash light will always come from the front and creative flash is of course limited as only the angle on the flash itself can often be determined. Another possibility of flash is that the flash is used separately from the camera, which creates a freedom for creative lighting because not only the angle on the flash can be set (depending on the flash), but also the complete position independently of the flash. the camera can be determined. We call working with the flash separate from the camera 'strobist'. In short, strobist photography is a form of light manipulation, using 1 or more flash units that you use separately from your camera by means of wireless remote's and receivers that you connect to your flash and camera, after which you can use your flash on a tripod, for example. to place the flash in different ways manipulate around the object or person you want to photograph.
Sweet spot:
The sweet spot is the aperture of F / 8 or F / 11 that many simple cameras have fixed to have an acceptable sharpness and depth of field at a reasonable exposure time. In addition, such an aperture usually delivers the best lens quality. Is almost always used with non-adjustable lenses such as the fixed focus lens from simple cameras.
Technical camera:
A technical camera is a large format camera consisting of a back wall with a holder for flat film, film cassette or polaroid and a front in which a shutter with built-in shutter is mounted. This front is also called a lens shelf. The front and back wall are interconnected with a light-tight bellows. Because both the front and the back wall are adjustable in all directions, all kinds of corrections can be applied and thus also all kinds of effects and possibilities are achieved. Despite its classic look, the tech camera is the most versatile camera out there. There are now also versions on the market where the film in the back wall is replaced by a complete digital camera, so that the best of both worlds can be achieved.
Top light:
Large light source that illuminates the subject of the photo from above.
Telephoto lens:
A telephoto lens is a lens with a focal length longer than 50mm (analog) or 35mm (digital) that sees less than our eye. But because this lesser is displayed full-screen, it seems as if it is brought closer. In 35mm format we speak of telephoto from 100mm, in medium format from 180mm and in large format from 360mm.
TIFF:
Stands for Tagged Image File Format, and is a compression technique in which - unlike JPEG - no information is lost and the image quality does not deteriorate. The disadvantage is that TIFF files are almost ten times larger than good JPEG files, so you need more memory cards.
TTL:
We speak of TTL measurement when the light from the camera is measured through the lens mounted on the camera. TTL measurement is short for Through The Lens. The advantage is that you really measure the light of the subject and not all kinds of disturbing light sources or very dark surfaces that just happen to be nearby. Almost all modern digital cameras now measure light in this way.
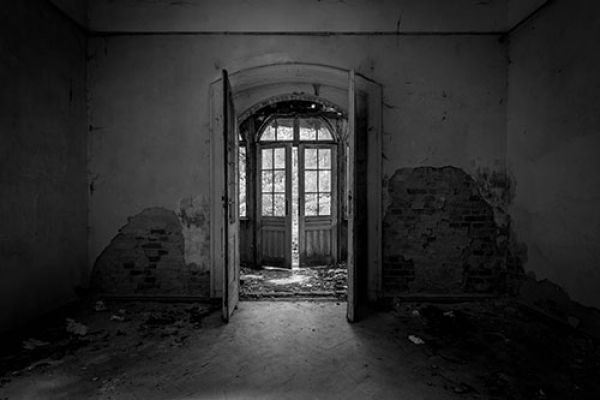
Urbex:
Urban exploring, Urbex or UE is the search of mostly abandoned buildings and sites that are (usually) not accessible to the public. The art is to photograph the beauty of decay.
Unwritten golden rule among Urbexers: TAKE NOTHING BUT PICTURE'S, LEAVE NOTHING BUT FOOTPRINTS.
Also, most urban explorers (also called urbexers) do not try to break any laws other than venturing into urban places to which they have no access, which some say is called a "victimless crime". (See also my article about this topic)
Vignetting:
We speak of vignetting or the phenomenon of vignetting when a photo has dark corners. This can happen during both recording and printing. Dis vignetting or vignetting is the decrease in brightness in the corners of an image or photo, relative to the center. A digital on a full-frame camera also provides vignetting. Other causes are a too thick filter on the lens, too small a lens hood or use of the wrong model and sometimes it is simply a lens error that disappears after stopping down a bit. Sometimes it is a conscious effect of the photographer to draw attention to the center of the image.
White balance:
Different light sources (such as sunlight, incandescent or fluorescent lamps) have their own color temperature - they contain different amounts of green, red and blue light. As a result, the colors of objects look slightly different under different light - something that we hardly notice, because the human brain is trained to conceal those differences.
In a camera, however, the differences in color temperature have to be compensated. This is done by setting the white balance - the combination of green, red and blue that together produces perfect white. The white balance can be set automatically, but on more advanced models you can also manually adjust the white balance to suit the ambient light.
Wide angle lens:
A wide-angle lens or wide-angle lens is a lens that “sees” more than the human eye, so that more is included in the picture. This has the disadvantage of giving a lot of distortion, especially at close range. After all, the greatly enlarged field of view is squeezed into a normal field of view. We speak of a wide angle when the angle of view is greater than 50 degrees. See also focal point. With a 35mm frame, a clear wide angle is 24mm, with medium format 50mm and with large format 90mm. A very strong wide-angle lens has more the behavior of a fisheye, although both types of lenses have little to do with each other in terms of construction and use.
Zoom objective:
A zoom lens, or zoom for short, is a lens with a focal length that is adjustable in length over a certain area. The zoom lens comes in a rotatable and slidable version. For a digital camera, the rotatable version is recommended because the extendable air draws in with possible dust when it is extended. This dust can then settle on the sensor. Naturally, a zoom lens is a compromise over prime lenses. For example, the quality is often slightly lower and the brightness is usually less. On the other hand, the convenient use options and the light weight of the zoom lens are offset.